That’s right, editor scripting is really fun! Besides having fun you can do lots of useful things with custom editor tools with Unity3D. After some boring Android plugin tutorials I would like to show some editor scripting tips and tools. I will again use github for this tutorial , you can clone it from here for the source code. Before we begin I would like to share same useful links for learning and understanding editor scripting;
- Check out Unity’s documentation for Editor class , EditorWindow class and also ScriptableWizard class.
- Unity wiki page for lots of editor scripts.
- Tutorial videos by Unity.
- Unity Unite presentation for advanced editor coding.
Let’s begin.First of all I ‘m going to talk about custom editor scripts. If you downloaded or cloned the repository go ahead and import the project into Unity and open “Tut-1-CustomEditor” folder.
-Decorative variables
Without writing any single editor code you can decorate your inspector with Unity’s build in PropertyAttributes. Here is some of them;
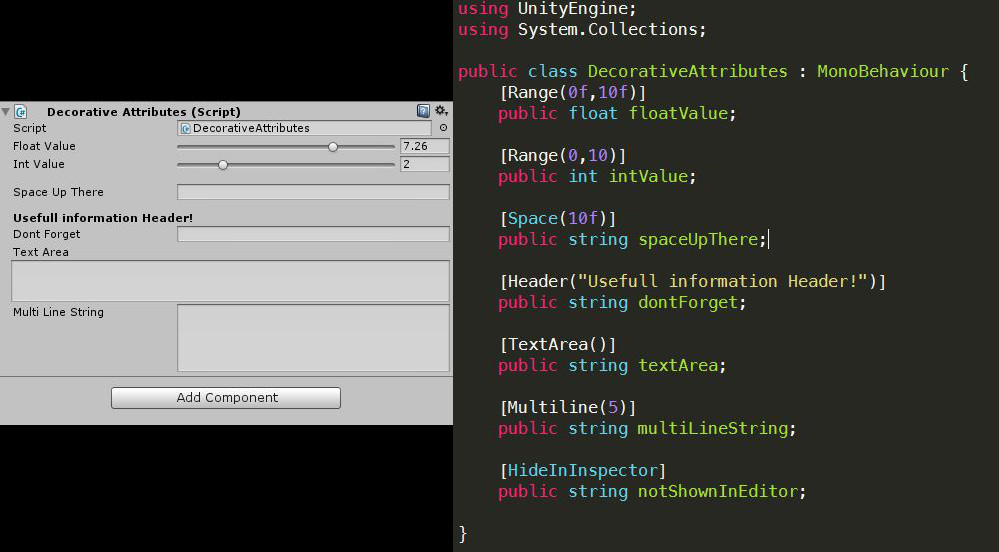 With these propertyattributes you can change your inspector to look like this for some variables. You can also make your own properydrawers for your serialized classes. You can check out the documentation from here. I’m not going to explain it here but I added an example script named “CustomClasEditor” inside the repository, you can take a look at that.
-Custom Editor
Moving on to custom editor. Why we need custom editor? There may be different answers for this question, but the simple one is we want our inspector to look more simple and not complicated. It won’t make a difference if you have a small script, but when it gets bigger you may need to write your custom editor. Take a look at the picture below,
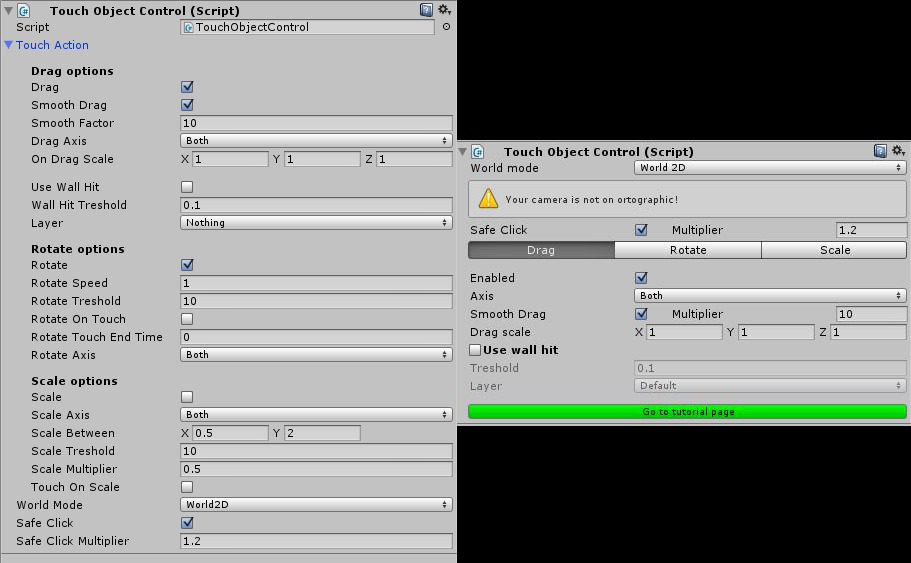
On the right we have a custom editor for our script. It look nice and easy to eye. As you can see, you can place warnings, buttons, foldouts that can make your life easier.
How to do it?
- First create your Editor folder inside project window. This is a special folder you are going to put everything you use for editor.
- Create your script, name it whatever you want. And start coding like this
using UnityEngine;
using System.Collections;
// first add editor namespace
using UnityEditor;
// this line defines which scripts editor it is.
[CustomEditor(typeof(TouchObjectControl))]
// if you want multiple editing option enabled
[CanEditMultipleObjects()]
// Editor class is our base class
public class TouchObjectControlEditor : Editor {}
After the first step. We need to reach our public variables. There is a couple way to do this. Like in the Unity’s docs you can find “SerializedProperty”s of your scripts by their name. But if you have too many variables copying and pasting over and over might get boring. A better way of doing is, getting the target on OnEnable method like this,
// our script
TouchObjectControl touchObjectControl;
// custom class we are using inside our script
TouchAction touchAction;
// our editor toolbar index
int toolBar;
void OnEnable ()
{
// get our script as target
touchObjectControl = target as TouchObjectControl;
// get our custom class
touchAction = touchObjectControl.touchAction;
// we want to start toolbar where we left off
toolBar = EditorPrefs.GetInt("index",0);
}
So we accesed our script(in our case “TouchObjectControl” as our target. Also for our toolbar I used EditorPrefs to get our toolbar int and to store it just call SetInt method on OnDisable method.
void OnDisable()
{
EditorPrefs.SetInt("index",toolBar);
}
To create your own GUI just override OnInspectorGUI method,
public override void OnInspectorGUI ()</pre>
{
// All your gui comes here
// DrawDefaultInspector();
}
If you uncomment DrawDefaultInspector method, Unity will draw your script’s inspector like its used to be. So here is the rest of the code,
public override void OnInspectorGUI ()
{
// DrawDefaultInspector();
checkMouse();
touchObjectControl.worldMode = (TouchObjectControl.World)EditorGUILayout.EnumPopup("World mode",touchObjectControl.worldMode);
if(touchObjectControl.worldMode == TouchObjectControl.World.World2D && !Camera.main.isOrthoGraphic)
{
EditorGUILayout.HelpBox("Your camera is not on ortographic!",MessageType.Warning);
}
EditorGUILayout.BeginHorizontal();
touchObjectControl.safeClick = EditorGUILayout.Toggle("Safe Click",touchObjectControl.safeClick);
if(touchObjectControl.safeClick )
{
touchObjectControl.safeClickMultiplier = EditorGUILayout.FloatField("Multiplier",touchObjectControl.safeClickMultiplier);
}
EditorGUILayout.EndHorizontal();

// Toolbar labels here
string[] menuOptions = new string[3];

menuOptions[0] = "Drag";
menuOptions[1] = "Rotate";
menuOptions[2] = "Scale";
toolBar = GUILayout.Toolbar(toolBar, menuOptions);

EditorGUILayout.Space();
switch(toolBar)
{
case 0:
touchAction.drag = EditorGUILayout.Toggle("Enabled",touchAction.drag);
if(touchAction.drag)
{
touchAction.dragAxis = (TouchAction.DragAxis)EditorGUILayout.EnumPopup("Axis",touchAction.dragAxis);
EditorGUILayout.BeginHorizontal();
touchAction.smoothDrag = EditorGUILayout.Toggle("Smooth Drag",touchAction.smoothDrag);
if(touchAction.smoothDrag)
touchAction.smoothFactor = EditorGUILayout.FloatField("Multiplier",touchAction.smoothFactor);
EditorGUILayout.EndHorizontal();
touchAction.onDragScale = EditorGUILayout.Vector3Field("Drag scale",touchAction.onDragScale);
if((touchAction.onDragScale.x != 1f || touchAction.onDragScale.y != 1f) && touchObjectControl.worldMode ==             TouchObjectControl.World.World2D)
{
if(touchObjectControl.transform.childCount == 0)
{
EditorGUILayout.HelpBox("Add a duplicate of this object as a child for drag scale. Scaling collider2d may cause unwanted collision actions!",MessageType.Warning);
}
}
touchAction.useWallHit = EditorGUILayout.BeginToggleGroup("Use wall hit",touchAction.useWallHit);
touchAction.wallHitTreshold = EditorGUILayout.FloatField("Treshold",touchAction.wallHitTreshold);
touchAction.layer = EditorGUILayout.LayerField("Layer",touchAction.layer);
EditorGUILayout.EndToggleGroup();
}

break;
case 1:
touchAction.rotate = EditorGUILayout.Toggle("Enabled",touchAction.rotate);
if(touchAction.rotate)
{
touchAction.rotateAxis = (TouchAction.RotateAxis)EditorGUILayout.EnumPopup("Axis",touchAction.rotateAxis);
touchAction.rotateSpeed = EditorGUILayout.FloatField("Speed",touchAction.rotateSpeed);
touchAction.rotateTreshold = EditorGUILayout.FloatField("Treshold",touchAction.rotateTreshold);
EditorGUILayout.BeginHorizontal();
touchAction.rotateOnTouch = EditorGUILayout.Toggle("Rotate on touch",touchAction.rotateOnTouch);
if(touchAction.rotateOnTouch)
touchAction.rotateTouchEndTime = EditorGUILayout.FloatField("Touch end time",touchAction.rotateTouchEndTime);
EditorGUILayout.EndHorizontal();
}
break;
case 2:
touchAction.scale = EditorGUILayout.Toggle("Enabled",touchAction.scale);

if(touchAction.scale)
{
if(touchObjectControl.worldMode == TouchObjectControl.World.World2D)
EditorGUILayout.HelpBox("Do not scale collider2D may cause unwanted action on Collision",MessageType.Warning);
touchAction.scaleAxis = (TouchAction.ScaleAxis)EditorGUILayout.EnumPopup("Axis",touchAction.scaleAxis);
touchAction.scaleBetween = EditorGUILayout.Vector2Field("Scale between",touchAction.scaleBetween );
EditorGUILayout.BeginHorizontal();
touchAction.scaleTreshold = EditorGUILayout.FloatField("Scale Treshold",touchAction.scaleTreshold);
touchAction.scaleMultiplier = EditorGUILayout.FloatField("Scale Multiplier",touchAction.scaleMultiplier);
EditorGUILayout.EndHorizontal();
// touchAction.touchOnScale = EditorGUILayout.Toggle("Scale on touch",touchAction.touchOnScale);
}
break;
default:break;
}

// urls for tutorial page
// Can delete this
EditorGUILayout.Space();
GUI.color = Color.green;
if(GUILayout.Button("Go to tutorial page",EditorStyles.miniButton))
{
Application.OpenURL("http://wp.me/p3azza-2E");
}
GUI.color = Color.white;
//
}

/// <summary>
/// Checks the mouse.If we are making changes saves for undo operation
/// </summary>
void checkMouse() {
Event e = Event.current;
if ((e.button == 0 && e.isMouse) ||(e.keyCode == KeyCode.KeypadEnter)) {
Undo.RecordObject(touchObjectControl,"record");
}
}
I’m not going to explain the whole code, because it’s really easy once you get into this. Just check out “TouchObjectControlEditor” inside “Tut-1-CustomEditor/Editor” folder from my repository, and Unity’s EditorGUILatout api thats all you need. One last tip check out checkMouse method. To make undo on custom editors you have to record it first. So check Undo class. You have to call it before making any changes. In this case I’m checking events like mouse clicks and keyboard entires to recording object. To reach those you can use Event class for Unity’s gui actions.
On the next tutorial we are going to make our own Transform editor that you can find inside same folder.

very good! Thanks for your article